After purchasing audiobooks on Audible you may want to store the files on your computer in case Amazon decides to pull the books later on. Audible allows you to download encrypted copies of your books from your account library.
Clicking on the “Download” link for any audiobook will download a
.aax file to your computer. This file contains audio data that has been
encrypted using a 4-byte key unique to your Audible account. Because the
key is so short it is trivial to break it using brute force and there
is plenty of software available specifically for that purpose. In this
blog post, I’ll be covering two ways to decrypt the file.
OpenAudible
OpenAudible a free open-source graphical program available for Linux, Windows, and macOS. It’s specifically designed to remove DRM from your Audible files and hides a lot of the complexity.
EDIT: OpenAudible appears to have become closed source and paid software. You can buy it if you want or try to find an old version, but see below for a free method.
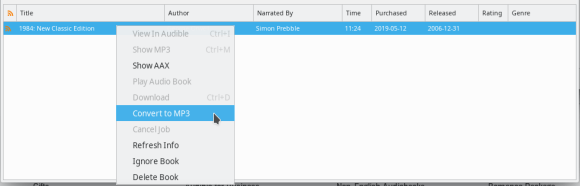
Once you install OpenAudible from its website you can drag and drop the .aax files you downloaded from Audible into it. They will show up in a list at the bottom of the window.
With your audiobooks loaded select them (Ctrl + A) and right-click to select “Convert to MP3”.
OpenAudible will convert each of your audiobooks to a DRM-free mp3
file and save them in the ~/OpenAudible folder on your computer. If you
can’t find the mp3 files then right-click one of the books and select
“Show MP3”.
One nice thing about OpenAudible over the FFMPEG method is that the
book’s metadata (author, reader, publisher, etc.) will be preserved in
the resulting mp3 file.
FFMPEG
ffmpeg is a popular free and open-source command line utility for processing video and audio. It can decrypt the Audible DRM but requires you to input the specific 4-byte encryption key unique to your Audible account. You can brute force your downloaded .aax files (you only need to get the key from one, and it will work for the others) using this website.
Once you’ve gotten your key you can use it to convert your .aax files to mp3s using ffmpeg like so (replace XXXX with your key):
I was recently tasked with solving a fun epidemiology puzzle for one of my university classes. Below is an excerpt from the assignment describing the scenario.
11 people get sick enough to go to a local hospital with severe
diarrhea and vomiting that lasts four days or so in each patient. All
the patients turn out to all have the same strain of norovirus.
It turned out that they all knew each other and over the summer had
been sharing produce from their gardens. The nurse’s hypothesis was that
one person had norovirus, and had transmitted the virus to others on
the food. She made a list, numbered the patients, starting with the
patient that had first shared, and who they had shared with. It turned
out a total of 16 people had shared produce, so she contacted the
additional people who had not gotten sick, and asked them who they had
shared produce with and when. In the end, she came up with the list
below. So, patient 1 first shared vegetables with patient 12, then with
patient 14. Patient 2 first shared vegetables with patient 5, then with
patient 15, and so on. And patient 1 never got ill, while patient 2 did.
Any time that two people come in contact with each other, the virus can
move either way. For example, it would be possible for patient 2 to
have infected patient 5, or patient 5 to infect patient 2.
After studying the list, she said, “I know who started this!” She
asked that patient where they had been recently and it turned out they’d
been on a cruise ship that had had a severe outbreak of norovirus!
Based on her data, which patient was the one who went on the cruise and
started the epidemic?
Data
Below is the dataset of patients and who they met with.
Patient
Meetings
Sick
1
12,14
FALSE
2
5,15
TRUE
3
6,16
TRUE
4
1,7,11
TRUE
5
10,3,16
FALSE
6
13,2
FALSE
7
2,8
TRUE
8
3,10
TRUE
9
15,5
TRUE
10
9
TRUE
11
14
TRUE
12
13,15
FALSE
13
16,3
TRUE
14
9
TRUE
15
16,5
FALSE
16
9
TRUE
Rules
So based on the above passage we can derive some simplified rules to use in solving the puzzle
Meetings happen sequentially going left to right
Rows are in chronological order going top to bottom
We don’t move onto the next row until all the meetings of the current row are complete
Each meeting has only two people
When two people meet the disease can go either direction
Solution
Theory
To solve this we need to find an algorithm that can identify patient
zero based on their interactions with others. At first, I thought about
using a graph-based approach to model each meeting, but the temporal
nature of the data makes that untenable. Instead, I opted for a much
simpler and intuitive approach that takes advantage of the ordering.
Since we know the precise sequence in which meetings occurred and we
know that each meeting contains only two people we can generate a list
of interaction tuples from the dataset. For example, 1 meets with 12,
then 14, and then 2 meets with 5. So we could have a list like so:
[(1, 12), (1, 14), (2, 5)]
Once we have our sequential list of interactions we can iterate
through them to simulate the effect of any given individual being
patient zero. Then it’s just a game of trial and error trying out
different possible patients. If we find a contradiction in our
simulation based on the data we were given (ie. someone gets sick in the
simulation but was healthy in the table) then we know that our guess
for patient zero was wrong and can move on to the next one. But if we
get all the way to the end of the simulation and everyone who was
supposed to get sick is sick and everyone who was supposed to be healthy
is healthy then we found our culprit.
Code
So now that we have a game-plan, we just need to code it up and find out who got everyone sick.
We’ll be using the Pandas python library for working with our table.
import pandas as pd
I’ve placed the table into a CSV file called data.csv which we’ll open as a Pandas DataFrame.
# Load the dataset into a DataFrame
df = pd.read_csv('data.csv')
We need to get the list of interactions in chronological order from
the table. To do this I’ll use a Python generator to iterate over the
rows and for each row I’ll split the meetings up and yield them.
def get_interactions():
    # Iterate through the rows of the DataFrame
    for index, row in df.iterrows():
        # Get each meeting in order
        for meeting in row['Meetings'].split(','):
            # Yield the interaction
            yield {row['Patient'], int(meeting)}
Great, so far so good. All we have left is the actual simulation to
write. For this, what we’ll do is keep a list of patients who are sick
in the simulation. It will start with just our guess for patient zero
and grow as they interact with others.
When we iterate through the interactions there are three possible situations that can happen:
The interaction has no sick people in it
The interaction has one sick person and one healthy person
The interaction has two sick people
If the interaction has no sick people or two sick people then we just
move along to the next one. But if it has one sick person and one
healthy person then we need to make the healthy person “sick” by adding
them to the sick_people set. However, before doing that we check with
our real data to see if the healthy person was recorded as being sick.
If they were then they get added and we keep going, but if they are
supposed to be healthy then we know that our hypothesis was wrong and
can return False.
Finally, if we make it through all of the iterations without
invalidating our hypothesis then it must be true and we will return.
# Test if our patient zero hypothesis is correct
def test_hypothesis(id, interactions):
    # A set of sick people in the simulation
    # starts with just patient zero
    sick_people = {id}
    # Iterate over the interactions in
    # chronological order
    for interaction in interactions:
        # Check if the interaction has at least
        # one sick person in it
        if sick_people.intersection(interaction):
            # If there is a sick person then
            # check if everyone in this interaction
            # was supposed to get sick.
            for person in interaction:
                # If they were then add them to the set
                if df[df['Patient'] == person]['Sick'].bool():
                    sick_people.add(person)
                # If they weren't then we are done and
                # can return False
                else:
                    return False

    return True
Alright, well that’s it! Just add a few more lines of code to run our functions and let’s see who it was.
# Get list of interactions
interactions = list(get_interactions())
# Iterate through the 16 candidates
for candidate in range(1, 17):
    # Check if our guess is correct
    if test_hypothesis(candidate, interactions):
        # Yay! We found them.
        print('It was {}!'.format(candidate))
        break
Run it!
(env) kyle@IntelNuc:~/Code/Python/Virus Spread$ python who_did_it.py
It was 7!
Well, it looks like it was patient #7 who got everyone sick. Mystery solved.
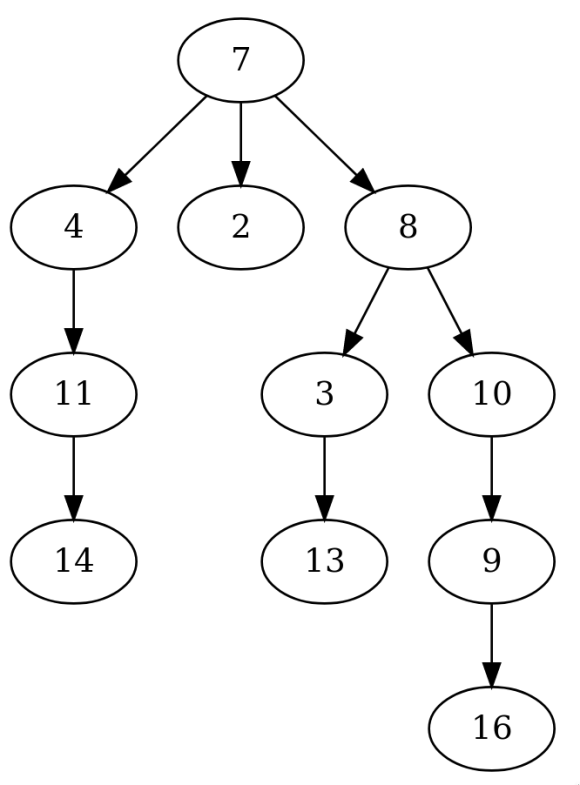
I decided to write another script using similar code to produce a
tree diagram of the infection which is pictured below. As you can see
the norovirus does indeed start with patient #7 and moves to all of the
other sick people from there. I encourage you to follow the path of the
tree through the table to confirm the results for yourself.
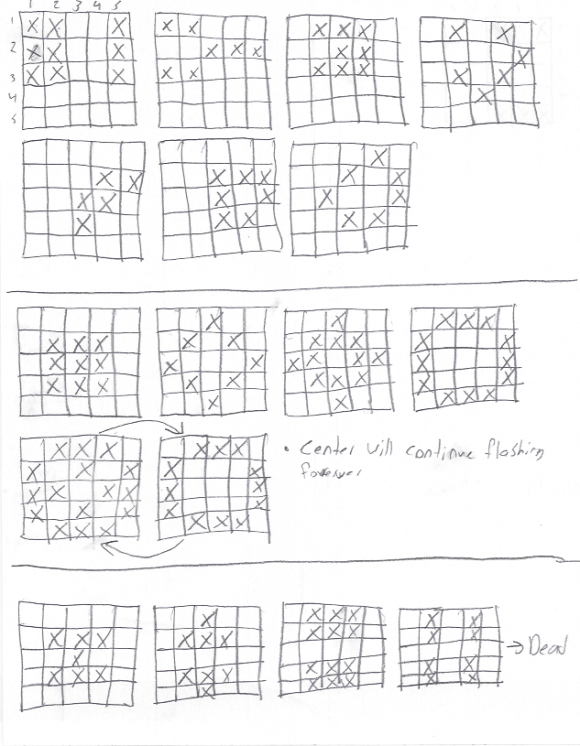
Can you find a pattern that returns to its starting point after more than two time steps?
What’s the longest you can see a pattern go without repeating a configuration?
To answer these questions I decided to build my own implementation of
Conway’s Game of Life in Python to brute force all possible starting
positions.
"""
Kyle's Game of Life Implementation
1) live cells die if they have 0, 1, or 4+ neighbors
2) empty cells have a birth if they have exactly three neighbors
"""

import numpy as np

# Create a blank board
board = np.zeros((5, 5))

def iterate(board):
	"""
	This function takes the current board state and returns the next state.
	"""
	conv_board = np.zeros((7, 7))
	conv_board[1:6, 1:6] = board
	conv = np.lib.stride_tricks.as_strided(
		conv_board,
		(5, 5, 3, 3), # view shape
		(56, 8, 56, 8) # strides
	)

	# The new board
	b = np.zeros((5, 5))
	for i in range(5):
		for j in range(5):
			# Count the number of neighbor live cells
			if conv[i, j, 1, 1] == 1:
				# Subtract itself from total count
				b[i, j] = conv[i, j].sum() - 1
			else:
				b[i, j] = conv[i, j].sum()

	# Cells with 0, 1, or 4+ die
	b[np.any([b <= 1, b >= 4], axis=0)] = 0
	# Living cells with 2 neighbors get to keep living
	b[np.all([b == 2, board == 1], axis=0)] = 1
	# Dead cells with 2 neighbors stay dead
	b[np.all([b == 2, board == 0], axis=0)] = 0
	# All cells with 3 neighbors live
	b[b == 3] = 1
	# Return the new board state
	return b

if __name__ == '__main__':
	while input('Continue? [y/n] ') == 'y':
		print(board)
board = iterate(board)
Results
It took approximately two hours to play all 225 possible
starting positions. There were 300,477,379 total steps taken with an
average of 8.95 steps per game. The game with the longest period was 39
steps.
This article was originally published on Steemit.com
Over the past month, I’ve been building a new search engine that indexes the steem blockchain. It’s currently live at asksteem.com.
The goal of AskSteem is to provide a reliable, powerful, and fast
search engine that is optimized for steem. In this post, I’d like to
cover some of the features that are available.
Query Syntax
There are many different ways that you can query the AskSteem index.
I’ve created a video demonstrating each of them, but you may also read
their descriptions and examples below.
Keyword/Phrase Search
Like many other search engines, you can search for general phrases
and terms. AskSteem will try its best to find the document that is most
relevant to your query based on our ranking algorithm.
Example Queries:Tip: Click the example to go to that query on AskSteem
How to buy bitcoinWhat is steemMarkdown tutorial
AskSteem provides a highly flexible and powerful date search tool for
posts. You can search by exact date or by date range. Dates must be in
the form of YYYY-MM-DD.
Example Queries:
Search for all posts posted on June 2, 2017
created:2017-06-02
Search for all posts posted between May 1, 2017, and May 31, 2017
created:[2017-05-01 TO 2017-05-31]
Search by Number of Votes/Comments
Similar to dates AskSteem has another set of robust tools that allow
searches based on the number of upvotes or comments a post receives.
Example Queries:
Posts with 150 votes:
net_votes:150
Posts with between 100 and 150 votes
net_votes:[100 TO 150]
Posts with 50 comments:
children:50
Posts with between 40 and 50 comments:
children:[40 TO 50]
Posts with more than 50 comments:
children:>50
or less than 50:
children:<50
this also works with votes, less than or equal to 10 votes:
net_votes:<=10
Searches with Boosts
You can prioritize certain parts of your query with boosts. These are indicated by placing a ^n at the end of a term, where n is the power you want to boost that part of the query to.
Example Queries:
Give the term bitcoin a boost of two:
I really want posts to have the term bitcoin^2 in them.
Give the term mine a boost of two, and term steem a boost of three:
How to mine^2 steem^3
Inclusive/Exclusive Search
You can indicate whether you want documents to contain certain terms by placing a + or a - in front of the term.
Example Queries:
Find documents about mining but not bitcoin:
cryptocurrency +mining -bitcoin
Wildcard Search
You can use the wildcard expressions of ? for a single character, or * to match any number of characters.
Example Queries:
How to mine any cryptocurrency:
How to mine *
Boolean Search
AskSteem supports any combination of the previously mentioned search
types in a single powerful query. This uses boolean values of AND, OR,
and NOT, along with parenthesis to separate statements. Example Queries:
Posts tagged with asksteem by @thekyle:
tags:asksteem AND author:thekyle
Posts with between 50 and 100 comments that have more than 500 upvotes
and that are tagged with ‘bitcoin’ or have the term bitcoin in the
document:
(bitcoin OR tags:bitcoin) AND (net_votes:>500 AND children:(>50 AND <100))
Posts created on June 2, 2017, with 100 or more upvotes but less than 10 comments:
created:2017-06-02 AND net_votes:>=100 AND children:<10
Developers
https://www.youtube.com/watch?v=aiqasuhUPXU
Because AskSteem integrates directly into the steem blockchain it can
read metadata directly from posts and use that data when performing
queries and displaying results. We encourage developers to add AskSteem
compatible metadata to their posts so that we can show links to your
application in our search results. The full documentation can be found
at asksteem.com/developers, however, in this post I will summarize the most important tags.
Tag
Description
Example
domain
The domain name or web address that your application is hosted on.
example.com
locator
The path to reach the post on the domain relative to the root.
/CATEGORY/@AUTHOR/PERMLINK
protocol
Either ‘http’ or ‘https’ if not provided then http will be used by default
https
If none of the above metadata is provided then AskSteem will link to
steemit.com for all posts by default, however, it is assumed that the
platform creating the content will have the best interface for viewing
it, so we would rather link there.
The domain and locator tags are required for custom linking to work, however, the protocol tag is optional and will default to http.
The domain tag should be the domain name that your web-based steem
application is hosted on and is subdomain sensitive (so if your hosting
on www subdomain then put that).
The locator should be the permalink to that particular post in your
applications URL structure, also notice the leading forward slash, this
is required.
The final URL that we point to will be generated by concatenating the
domain and locator together with the protocol at the beginning which
will be http unless otherwise specified.
Additionally, if you are building an application on the steem blockchain and need a search API please email us at contact@asksteem.com, we are able to query custom metadata and make various other customizations to the ranking algorithm to support your use case.
Funding
The harsh reality is that search engines are expensive to run and
that adding new features and improving performance are difficult if the
basic funding needs of the project are not covered. AskSteem currently
costs me about $100/month to run, and that number will, of course,
continue to increase as steem grows and the index size increases.
Ideally, my goal is the have those costs covered through upvotes from
the steem community and to use any extra money for adding new features
and scaling the search infrastructure to meet demand. If this works then
AskSteem will be the first search engine in the world to use a
cryptocurrency based revenue model, instead of selling advertising.
The New iPod Touch from Apple is a great way of getting an iOS
8/9 experience without having to pay the hefty price of the iPhone.
However while cheaper than the iPhone it does come with a few drawbacks,
one of which is that it cannot be used to make Phone calls or send text
messages (by default). However, with today’s technologies, it’s pretty
easy for even the most non-technical people to start making phone calls
from their new iPod.
Step #1 – Create a Google Account
If you’ve already got a Google account this can be skipped however
the service will be using is owned by Google and requires a free Google
account to start using it. You can register here.
Step #2 – Get Google Voice
Next in your browser while signed into your Google account visit voice.google.com and run through the basic setup process.
Google Voice Setup:
Choose I want a New Number from the Initial Setup or if you prefer you can use your current number.
Add any of your current phones as a Forwarding phone. (What Phone You Choose doesn’t matter for this tutorial)
Enter Your Zipcode, or a Keyword to search for available numbers to
choose from, then a list should appear and you can pick a number that
you like.
Step #3 – Edit Basic Settings (Optional)
Once you set up your Google Voice account and select your number you
can change specific settings such as your voicemail and pins by clicking
on the gear icon in the upper right corner of the user interface and
selecting settings.
Step #4 – Install Google Voice App
Next, you just have to install the Google Voice App
on your iPod and connect it to your Google Account. Once you complete
the Application setup your ready to send and receive text messages, and
phone calls from your iPod for free. The number that you give to people
to call you is the same number you choose when you set up Google Voice.
If you forgot your number then you can find it easily by logging into Google Voice and finding the listed phone number in the left column.
While Gigapros do have Shared and VPS hosting, where they really
shine is in their Dedicated Servers. They have a very different way of
operating that differentiates them for many other web-hosts and puts
them as number one on this list. The main one being how they allow you
to pick exactly the specs you need for your server, including RAM, CPU,
and any Operating System from CentOS to Windows. On top of that, you can
add, some extremely competitive pricing such as a 64 GB of RAM, and 3.8
GHz Processor server coming in at just 119 USD a month.
2. BlueHost
I like to think of Bluehost as the Apple of the web hosting world.
While they do shine in some areas the main that I find really unique are
support and simplicity. To address the first one, in all the times I’ve
ever had an Issue with any of my Bluehost servers I never had to wait
for more than 5 minutes before getting into their real-time chat with
someone who can actually help me, instead of some low-level salesperson.
The simplicity part is not necessarily as big of a deal with the Pro
web-designers and Entrepreneurs as with the newbies, but its always nice
to have everything you need available in one place (such as Domains,
Hosting, etc.). Another quick side note is that for some reason I’ve
never had to wait more than 5 minutes for a domain I purchased through
Bluehost to propagate for their servers.
3. DreamHost
I’ve always had mixed feelings about Dreamhost based on my first
experiences with them, however as of the time I’m writing this review
I’m glad to say that they’ve really become one of the more competitive
web-hosts. While they really don’t offer any of the simplicity of
Bluehost or the low prices of Gigapros if you’re looking for a good mix
between Price, Support, and Reliability then Dreamhost is defiantly a
good candidate to look into.
4. HostGator
HostGator is another company similar to BlueHost as in they put
customer satisfaction, and support before anything else. While neither
their VPS or Dedicated servers give you as much bang for your buck as
Gigapros, they still offer very powerful Dedicated servers. While you
shouldn’t expect to go starting your own social network on HostGator,
you can certainly get some really large WordPress or other basic CMS
sites going. HostGator also similar to Gigapros offers both Linux and
Windows server hosting.
5. GoDaddy
I’d be amiss not to at least talk about GoDaddy in this list
considering they are probably the most popular web hosting company.
Although to be Frank nearly every experience I’ve had with actually
hosting with GoDaddy has been just terrible, and I can’t recommend you
buy anything but Domain Names from them.
So you’re doing good for yourself and making decent earnings
off AdSense. But then one day you get that email in your inbox with the
subject “AdSense Account Disabled” and everything changes. You suddenly
realize that any other respectable Ad Networks either have low CPM or
are just pure scams. So here I’ve compiled a list of all the other
Advertising Networks I tried before I got my AdSense Account back.
While I am aware that Amazon Associates is technically an affiliate
network I wanted to include it on this list simply because it’s a great
source of extra revenue if you’ve got a site with a heavy and loyal
following or a high conversion rate. It pays out similar to any other
Affiliate program (based on sales) however since Amazon has such a large
variety of products its easier to find relevant products than with
other affiliate sites.
Chitika pays via PayPal and allows you to customize your ads to
better suit your websites like AdSense. The Downside to Chitika is its
search-driven meaning the ads shown, are based on what Search Terms were
used to get to your site not the keywords on your site.
This is ad network creates blue underlined words like hyperlinks in
your content automatically, and only shows ads when the links are
hovered over by the user. Currently, InfoLinks doesn’t support any type
of banner ads however they do have lower requirements so if your site is
just starting up it might be worth a try.
Despite having a rather strange name ProjectWonderful has a very
unique model based on advertisers renting time on your site. The best
part being that the system works on a bidding system so you usually end
up making more money than you would with CPM or PPC Ads.
Similar to ProjectWonderful, BuySellAds allows advertisers to pay for
Ad space on your websites based on how much they are willing to pay or
how much your minimum advertising cost is.
Advertising.com is AOL’s solution to advertising (yes AOL) and has
become a very large and respectable ad network online, although they do
have rather high requirements compared to some of the others listed
above.
This Ad Network is by far the king of the CPM Networks and requires
about 500,000 Impressions per month. Although it has a high need it pays
off well with some of the highest CPM Rates on the internet, even when
compared to AdSense.
Media.net is part of the Yahoo | Bing Ad Network, and so is basically
Microsoft’s equivalent of AdSense. While the exact requirements are
unknown its very difficult to get invited into this ad network is so far
we’ve only seen sites with millions of monthly users using.
Bad Eggs
During my time looking for Google Adsense alternatives, I also found a
few spammy/scam Advertising networks that look legit but will end up
not paying you or showing fewer clicks/impressions then your ads
actually get.
RevenueHits
While this site would convince anyone that it’s a legit ad-network I
found that all of there ads were spammy download buttons, and sometimes
opened up popups or tried to download malicious software to the
visitor’s computer. I have also heard stories of people getting their
entire sites blacklisted from Google as being malicious because of
RevenueHits Ads.
AdHexa
While Adhexa will indeed pay you and has better quality ads then
RevenueHits they often seem to only count a fraction of the impressions
your actually getting which may simply be a software glitch on their
servers but still stay away until they become more reputable.
If you haven’t been following it then you might be surprised
that a young start-up by the name of ‘DuckDuckGo’ is challenging the
mighty search giant Google. But on February 19, 2008, the new
privacy-focused search engine emerged and was incorporated. The main
difference between DuckDuckGo and Google is that DuckDuckGo claims not
to track your searches, and not to customize search results based on
your previous searches. DuckDuckGo also offers many features that Google
does not such as a Clean modern interface, Automatically Searching a
site, and many more. However, it should be noted that most of the
features that DuckDuckGo has that Google doesn’t aren’t really all that
useful in your everyday searching experience. DuckDuckGo also does not
rely heavily on a Web crawler, but instead API’s from other search engines like Bing, Yahoo, and smaller specialty search engines such as Sound Cloud.
While all this sounds great, Google still has the advantage over
DuckDuckGo when it comes to actually finding you what you want. Because
DuckDuckGo won’t track you, and won’t give you personalized results, you
also won’t be getting as relevant results as you would by using Google.
Another thing is that even with its many API’s and Search Sources
DuckDuckGo has a much smaller Index than Google so when you search you
will find far less relevant results simply because there is less
diversity. Overall it comes down to Privacy VS Better Results, as
DuckDuckGo offers Privacy, but Google offers better results.
Almost every site on the web has a robots.txt file located at
Example.com/robots.txt which tells web crawlers or bots what they are
allowed to visit and what they are not allowed to visit. This can be
helpful for blocking off admin areas or backend files that you do not
need or want crawled or giving bots information like the URL(s) to your
sitemap(s).
So what actually is a robots.txt? Well, it’s just a simple text file
made in notepad or any other word processor that has several tags that
web crawlers understand. The Following are some examples of common
elements that you might see in a Robots.txt file.
# Basic Robots.txt allowing bots to visit your whole site
User-agent: *
Disallow:
# Robots file telling bots not to crawl any part of the site
User-agent: *
Disallow:/
# Robots file telling bots not to crawl any files in the admin directory (backend)
User-agent: *
Disallow: /admin/
You can also use tags such as the Sitemap tag to tell bots where to find your XML sitemap or RSS feeds to increase crawl rates.
There are a few drawbacks to using a robots.txt file though, mainly
being that it is public to anyone who wants it so if you are trying to
hide an exposed backend directory or an admin area with the Disallow tag
anybody can view your robots, and it does not stop regular users from
visiting those pages. Another thing is that not all bots obey the
Robots.txt file, these are mainly malicious bots that are trying to spam
post comments or upload malware to your web servers. These bots may use
your Robots file against you by visiting you disallow links in an
attempt to crack your admin accounts.
In most cases the benefits of having an up to day robots.txt file out
weight the drawbacks because of the increased search engine crawling
from spiders like GoogleBot or BingBot. It also helps to give
information about your site to smaller search engines that might not
have a “webmaster tools” section like DuckDuckGo or AskClash about where your sitemaps are located.
Overall it’s up to you how much time you want to spend designing your
robots.txt file and how you want to deal with the possible threats too
using one.
I feel that there is a lot of confusion as too exactly what
DoFollow and NoFollow links do and don’t do. A common misconception is
that if something is marked NoFollow then search engines won’t follow
the link at all. This, however, is not true at all, because web crawlers
simply aren’t going to pass up a potentially content rich page because
its NoFollow. However, this doesn’t mean that search engines don’t treat
the NoFollow links different than Dofollow.
Google Bot visiting a NoFollow Link
The real thing that the two types of links determine is the transfer
of Page Rank or commonly referred to as “PR”. Page rank is how search
engines determine how important a website is by counting the number of
backlinks to the site. The idea behind this is that if your website has
lots of other website linking too it then your website must have good
and quality content, so it should be ranked higher in the search
results. The higher number of backlinks you have to your site the higher
Page Rank you will have.
NoFollow links are basically links that search engines don’t count as
a backlink. This is a common practice on High PageRank sites because
the higher the PageRank of the site linking to your the more it will
affect your PageRank.
DoFollow tells the search engines to count the link as a backlink to
the site and thus gives the site being linked to a higher PageRank based
on the PR of the site linking to it.
Many sites on the web now use NoFollow links because of automated
bots designed to browse the web and post links as an attempt to build
backlinks to a certain domain, usually of questionable content.